How to ship full-stack data apps in a weekend without sacrificing maintainability
How to ship full-stack data apps in a weekend without sacrificing maintainability

You can ship a full-stack data app in a weekend—and keep Monday calm.
The trick is not doing less architecture. It’s choosing a small set of modular Azure services, enforcing a few non-negotiable boundaries, and automating just enough deployment to keep velocity from turning into entropy.
That is the thesis of this tutorial:
A maintainable weekend build comes from disciplined simplification: use a minimal modular architecture, keep schema and identity boundaries explicit, automate environment setup lightly, and avoid premature service sprawl so the app can move from prototype to production without a rewrite.
This is for architects, tech leads, and platform teams who want a repeatable pattern for shipping fast without creating a refactor tax.
A practical weekend build path looks like this:
- Friday night: scaffold the repo, provision the baseline Azure resources, and wire identity/secrets
- Saturday: build the core UI, API, schema, and seed data
- Sunday: automate deployment, run migrations, add telemetry, and smoke test the release
Step 1: Start with the architecture you can still explain next week
Weekend builds usually fail for boring reasons:
- secrets get hardcoded
- the front end talks to database-shaped responses
- nobody creates a migration path
- the team adds five managed services before validating one workflow
- deployment lives in a senior engineer’s shell history
The goal is not “enterprise complexity in 48 hours.” The goal is a blueprint with clean seams.
The four boundaries that matter
For a small full-stack data app, I recommend starting with these four runtime boundaries:
- Front end
- Thin API
- Transactional database
- Storage and observability
Then treat identity and secrets as cross-cutting concerns from day one.
A practical Azure stack for this looks like:
- Static Web Apps or App Service for the UI
- Azure Functions or a thin API hosted on App Service
- Azure SQL Database for transactional data
- Azure Blob Storage for files, exports, and artifacts
- Azure Key Vault for secrets
- Application Insights for telemetry
That is enough to ship something real. It is also small enough that one team can understand it.
Microsoft’s cloud cost guidance keeps reinforcing a durable principle: fewer services usually means less operational overhead, less permissions surface area, and less cost management work after the demo is over (Azure cost optimization guidance: https://azure.microsoft.com/en-us/blog/cloud-cost-optimization-principles-that-still-matter/).
The reference architecture
Here is the shape we want: UI calls API, API owns validation and data access, infrastructure wires secrets and telemetry.
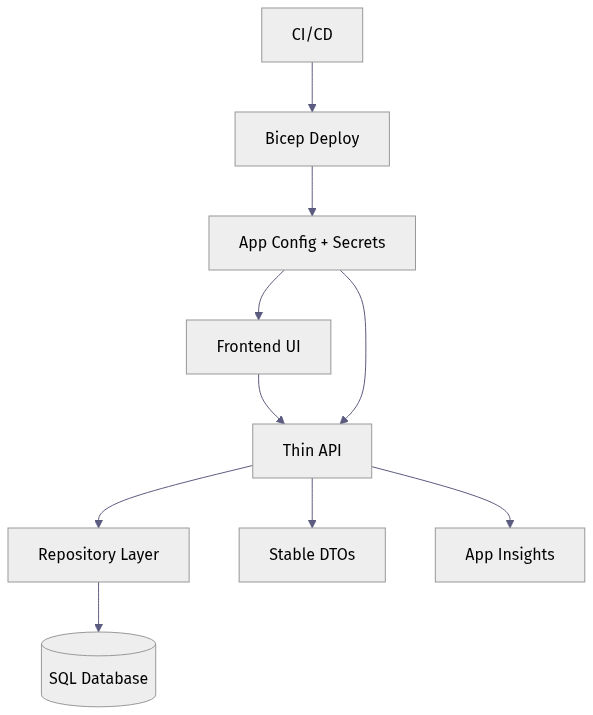
What matters is not the exact hosting choice. It is that the UI never reaches around the API to touch the database, and deployment/configuration are explicit parts of the system.
Where API Management fits—and where it does not
Azure API Management is a strong platform when you need external consumers, policy enforcement, versioning, rate limiting, or centralized API governance (https://azure.microsoft.com/en-us/blog/microsoft-named-a-leader-in-the-idc-marketscape-worldwide-api-management-2026-vendor-assessment/).
But for a weekend build, don’t add API Management on day one unless you already know you need those controls. Build the API boundary now so you can add governance later without redesign.
Step 2: Choose the smallest architecture that preserves clean seams
The right question is not “What is the most scalable architecture possible?” It is “What is the smallest architecture that keeps the seams clean?”
Use these service selection criteria
Pick services based on:
- team familiarity
- deployment simplicity
- managed identity support
- operational visibility
- ease of local development
- minimal platform sprawl
Acceptable shortcuts:
- one monorepo
- one deployable backend service
- one transactional database
- seed data for demo workflows
Dangerous shortcuts:
- UI logic coupled directly to SQL access rules
- app config files containing secrets
- ad hoc schema changes in production
- multiple databases for no clear reason
- introducing queues, event buses, or vector stores “just in case”
A monorepo is often the right answer
For a weekend build, a monorepo with explicit folders is usually the best tradeoff:
/appfor the front end/apifor the service layer/dbfor migrations and seed scripts/infrafor Bicep/scriptsfor bootstrap tasks/docsfor the architecture note
One repo does not mean one blob of code. The maintainability comes from explicit boundaries inside the repo.
Step 3: Create a repo structure that can survive next week
The first implementation step is not the UI. It is the shape of the repo and the contracts that stop accidental coupling.
Make contracts explicit
Shared contracts can be defined with:
- DTO types
- JSON schema
- OpenAPI
- typed client models
The key is that the front end should depend on stable API responses, not raw database columns.
Keep architecture documentation short and visible
You do not need a 20-page design doc. You do need:
- a one-screen diagram
- a README that explains the services
- setup steps for local and cloud environments
- a note on where secrets live
- a note on how migrations run
That replaces tribal knowledge with a repeatable starting point.

Step 4: Start with schema discipline, not just tables
Fast apps still need durable data.
Azure’s database modernization messaging is a useful reminder here: the data layer is not a disposable detail, especially if the app might later support analytics, AI features, or more operational load (https://azure.microsoft.com/en-us/blog/introducing-azure-accelerate-for-databases-modernize-your-data-for-ai-with-experts-and-investments/).
Define the transactional model first
Before building forms, define:
- core entities
- required constraints
- primary keys
- audit timestamps
- migration naming/versioning
- seed data strategy
For a weekend app, you are not modeling every future edge case. You are making sure the first schema is reproducible.
Use versioned migrations and reproducible seed data
This example is written for Azure SQL Database. It creates a migration tracking table, a transactional orders table, and inserts a known demo row only if it does not already exist.
-- Versioned migration and seed script for Azure SQL Database
BEGIN TRANSACTION;

IF OBJECT_ID('dbo.schema_migrations', 'U') IS NULL
BEGIN
    CREATE TABLE dbo.schema_migrations (
        version VARCHAR(20) NOT NULL PRIMARY KEY,
        applied_utc DATETIME2 NOT NULL CONSTRAINT DF_schema_migrations_applied_utc DEFAULT SYSUTCDATETIME()
    );
END;

IF OBJECT_ID('dbo.orders', 'U') IS NULL
BEGIN
    CREATE TABLE dbo.orders (
        id INT NOT NULL PRIMARY KEY,
        customer_id INT NOT NULL,
        amount_cents INT NOT NULL,
        created_utc DATETIME2 NOT NULL CONSTRAINT DF_orders_created_utc DEFAULT SYSUTCDATETIME(),
        CONSTRAINT CK_orders_amount_cents_positive CHECK (amount_cents > 0)
    );
END;

IF NOT EXISTS (SELECT 1 FROM dbo.schema_migrations WHERE version = 'v001_init')
BEGIN
    INSERT INTO dbo.schema_migrations (version)
    VALUES ('v001_init');
END;

IF NOT EXISTS (SELECT 1 FROM dbo.orders WHERE id = 1)
BEGIN
    INSERT INTO dbo.orders (id, customer_id, amount_cents)
    VALUES (1, 42, 2599);
END;

COMMIT TRANSACTION;
What to observe: the maintainability win is not sophistication. It is repeatability. A new environment can be created from known schema state instead of tribal memory.
Keep transactional and derived data separate
If you later need search indexes, reporting tables, or AI-oriented projections, keep them separate from the transactional schema. Do not overload your primary app tables with every downstream concern.
That one decision dramatically reduces rewrite pressure later.

Step 5: Put an API boundary between the UI and the data layer
This is the boundary that saves the most rework.
A thin API should own:
- request validation
- authorization checks
- mapping between storage models and API models
- repository access
- error handling
- telemetry hooks
It should not expose raw database internals to the browser.
Build workflow-shaped endpoints, not table-shaped endpoints
If the user workflow is “create order,” expose POST /orders. Do not force the front end to understand every storage detail.
This illustrative FastAPI example keeps the endpoint small while still doing the right things: validate input, call a repository, and map a storage row to a stable DTO.
# Thin FastAPI endpoint with validation, repository usage, and stable DTO mapping
from fastapi import FastAPI
from pydantic import BaseModel, Field
from dataclasses import dataclass

app = FastAPI()

class CreateOrderRequest(BaseModel):
    customer_id: int = Field(gt=0)
    amount_cents: int = Field(gt=0)

class OrderDto(BaseModel):
    id: int
    customer_id: int
    total: str

@dataclass
class OrderRow:
    order_id: int
    customer_ref: int
    amount_cents: int

class OrderRepository:
    def create(self, customer_id: int, amount_cents: int) -> OrderRow:
        return OrderRow(order_id=101, customer_ref=customer_id, amount_cents=amount_cents)

@app.post("/orders", response_model=OrderDto)
def create_order(req: CreateOrderRequest) -> OrderDto:
    row = OrderRepository().create(req.customer_id, req.amount_cents)
    return OrderDto(id=row.order_id, customer_id=row.customer_ref, total=f"{row.amount_cents / 100:.2f}")
What to observe: the DTO shape is intentionally stable even though the repository row uses different field names. That decoupling is the whole point.
Keep the front-end client dependent on DTOs
Now the UI can call the API without knowing anything about table names or internal column conventions.
// Small frontend API client that depends on stable DTOs instead of database-shaped responses
type OrderDto = {
  id: number;
  customer_id: number;
  total: string;
};

export async function createOrder(customerId: number, amountCents: number): Promise<OrderDto> {
  const response = await fetch("/api/orders", {
    method: "POST",
    headers: { "Content-Type": "application/json" },
    body: JSON.stringify({ customer_id: customerId, amount_cents: amountCents })
  });

  if (!response.ok) {
    throw new Error(`API error: ${response.status}`);
  }

  return (await response.json()) as OrderDto;
}
What to observe: the client depends on a stable contract. If the database changes later, you can often preserve the API shape and avoid breaking the UI.
Step 6: Handle secrets and identity before the first demo
This is the step teams skip when they are moving fast. It is also the step that creates the ugliest Monday.
Microsoft’s defense-in-depth guidance explicitly frames risk across identity, software supply chain, control plane, networks, and data, which is why even fast-moving app teams should treat layered security as a baseline design principle rather than a later hardening phase (https://azure.microsoft.com/en-us/blog/azure-iaas-defense-in-depth-built-on-secure-by-design-principles/).
The minimum viable identity model
Keep these identities separate:
- developer identity
- application identity
- end-user identity
Do not collapse them into one credential or one trust boundary.
That means:
- developers authenticate as themselves
- the deployed app authenticates as the app
- users authenticate through the user-facing identity flow
- secrets are not embedded in source code or local config defaults
Use Key Vault and managed identity where possible
For a weekend app, the practical version is simple:
- Key Vault for secrets
- managed identity for the deployed app
- separate local-development configuration from cloud production settings
- no raw secrets committed to source or hand-edited into the portal
If your app can use Microsoft Entra authentication to access Azure SQL directly, that is the cleanest pattern. If you still need a secret for a specific library or migration tool, store it in Key Vault and reference it from the host configuration rather than copying it into app settings by hand.
Step 7: Add lightweight deployment automation on day one
The difference between a fast prototype and an unrepeatable snowflake is usually one small automation layer.
Use Bicep to define the minimum platform
For this pattern, your infrastructure code should provision:
- resource group-scoped resources
- app hosting
- database
- Key Vault
- monitoring
This Bicep composition wires those pieces together with outputs for the API URL and vault URI. The database module is assumed to configure Microsoft Entra admin and database access for the app’s managed identity.
// Main Bicep composition wiring app hosting, database, Key Vault, and Application Insights
param location string = resourceGroup().location
param appName string
param sqlAdminLogin string
@secure()
param sqlAdminPassword string

module monitor './modules/monitor.bicep' = { name: 'monitor'; params: { appName: appName location: location } }
module vault './modules/vault.bicep' = { name: 'vault'; params: { appName: appName location: location } }
module data './modules/sql.bicep' = { name: 'data'; params: { appName: appName location: location sqlAdminLogin: sqlAdminLogin sqlAdminPassword: sqlAdminPassword } }
module app './modules/app.bicep' = {
  name: 'app'
  params: {
    appName: appName
    location: location
    appInsightsConnectionString: monitor.outputs.connectionString
    keyVaultUri: vault.outputs.vaultUri
    sqlConnectionString: data.outputs.connectionString
  }
}

output apiUrl string = app.outputs.apiUrl
output keyVaultUri string = vault.outputs.vaultUri
What to observe: keep the modules few, and keep secrets out of the application configuration path. In a production-ready version of this pattern, prefer managed identity for app-to-database access and retrieve any remaining secrets through Key Vault references rather than passing raw connection strings through outputs.
Configure the app host with telemetry and secret references
Your app hosting layer should inject the settings the runtime needs, including telemetry and secret/config endpoints.
// Minimal app hosting module with app settings for observability and secret references
param location string
param appName string
param appInsightsConnectionString string
param keyVaultUri string
param sqlConnectionString string

resource plan 'Microsoft.Web/serverfarms@2022-09-01' = {
  name: '${appName}-plan'
  location: location
  sku: { name: 'B1', tier: 'Basic' }
}

resource site 'Microsoft.Web/sites@2022-09-01' = {
  name: '${appName}-api'
  location: location
  properties: {
    serverFarmId: plan.id
    siteConfig: {
      appSettings: [
        { name: 'APPLICATIONINSIGHTS_CONNECTION_STRING'; value: appInsightsConnectionString }
        { name: 'KEY_VAULT_URI'; value: keyVaultUri }
        { name: 'SQL_CONNECTION_STRING'; value: sqlConnectionString }
      ]
    }
  }
}

output apiUrl string = 'https://${site.properties.defaultHostName}'
What to observe: the pattern to teach here is centralized configuration at deploy time. In the Azure version I recommend, the app host uses a system-assigned managed identity plus Key Vault references for any secret-backed settings, and the API uses Microsoft Entra auth to reach Azure SQL where supported.
Add one bootstrap script for fast environment creation
A weekend team should be able to stand up an environment with one command. This example uses PowerShell and Azure CLI to create a resource group, deploy Bicep, and run a health check. Configuration lives in infrastructure code rather than post-deploy portal edits.
# Weekend bootstrap script for resource group creation, Bicep deploy, config wiring, and smoke test
param(
  [string]$ResourceGroup = "rg-weekend-dataapp",
  [string]$Location = "eastus",
  [string]$AppName = "weekenddataapp$((Get-Random -Maximum 9999))"
)

az group create --name $ResourceGroup --location $Location | Out-Null
$deployment = az deployment group create `
  --resource-group $ResourceGroup `
  --template-file ./infra/main.bicep `
  --parameters appName=$AppName sqlAdminLogin=sqladmin sqlAdminPassword="P@ssw0rd123!" `
  --query properties.outputs -o json | ConvertFrom-Json

$apiUrl = $deployment.apiUrl.value
az webapp config appsettings set --resource-group $ResourceGroup --name "$AppName-api" `
  --settings "APP_ENV=weekend" "FEATURE_SAMPLE_DATA=true" | Out-Null

Invoke-RestMethod -Uri "$apiUrl/health" -Method Get | Out-Null
Write-Host "Smoke test passed at $apiUrl/health"
What to observe: the repeatable flow is the point. In practice, remove inline credentials, source secure parameters from your CI/CD secret store or prompt securely at runtime, and keep app settings in Bicep so the script stays focused on orchestration rather than drift-prone mutation.
Keep CI/CD intentionally small—but complete
A minimal GitHub Actions workflow should:
- authenticate to Azure
- build and test
- deploy infrastructure
- run migrations against the provisioned database
- package and deploy app code
- smoke test
Because migrations need the target database to exist first, infrastructure deployment comes before migration execution.
# GitHub Actions workflow for build, migrate, deploy, and health verification
name: weekend-ship

on: { push: { branches: [main] } }

jobs:
  deploy:
    runs-on: ubuntu-latest
    steps:
      - uses: actions/checkout@v4
      - uses: actions/setup-python@v5
        with: { python-version: '3.12' }
      - uses: actions/setup-node@v4
        with: { node-version: '20' }
      - run: pip install -r api/requirements.txt && npm ci --prefix web
      - run: python api/scripts/apply_migrations.py
      - run: az deployment group create -g $RG -f infra/main.bicep -p appName=$APP_NAME
      - run: az webapp deploy -g $RG -n $APP_NAME-api --src-path api.zip
      - run: curl --fail https://$APP_NAME-api.azurewebsites.net/health
What to observe: the exact commands will vary by stack, but the teaching sequence should not. Authenticate first, create the target platform, run migrations against that target, deploy a built artifact, then verify the app is healthy.
Step 8: Wire in observability before you need it
Fast shipping is much safer when failures are diagnosable.
Add three kinds of telemetry from the start
At minimum, capture:
- structured logs
- request traces
- business events
For a small data app, useful business events might include:
- order created
- file uploaded
- export generated
- login failed
- migration applied
Define success and failure explicitly
Do not wait for a production incident to decide what matters. Pick a few signals:
- API latency p95
- failed writes
- auth failures
- migration errors
- health endpoint status
- front-end error rate
Application Insights is a practical default because it can correlate request telemetry across app components when configured correctly.
Understand the deployment flow end to end
This sequence is the operational story you want: code push, infrastructure deployment, migration, app configuration, code deployment, health validation.
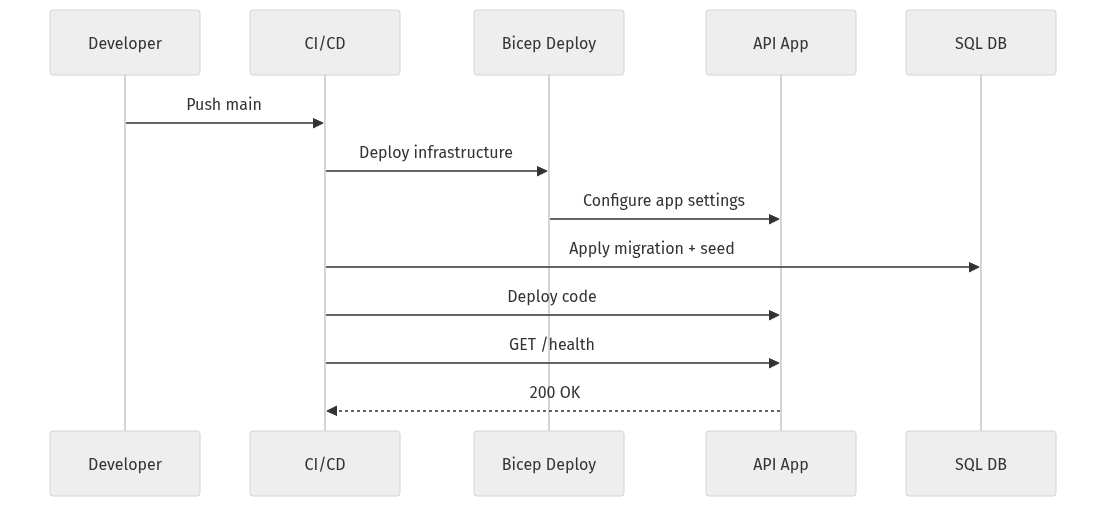
What to observe: the sequence includes migrations and health checks as first-class steps. That is what turns deployment from “copy files somewhere” into a controlled release.
Step 9: Keep storage choices boring and reversible
The database is not your file system. And your hot path is not where every asset belongs.
Use object storage for the right things
Azure Blob Storage is a good fit for:
- uploaded files
- exports
- generated reports
- static artifacts
- archived payloads
- log offloads
Keep operational relational data in the database, and move colder assets elsewhere.
Microsoft’s storage guidance around smart tiering reinforces the same principle: align storage cost with actual access patterns instead of treating all data as equally hot forever (https://azure.microsoft.com/en-us/blog/optimize-object-storage-costs-automatically-with-smart-tier-now-generally-available/).
Step 10: Know what to skip in a weekend build
This is where maintainability is often won.
Skip these unless the use case clearly demands them:
- event buses
- multiple databases
- API gateways on day one
- vector stores for speculative AI features
- microservices split by guesswork
- custom authentication stacks
- background processing systems without an actual async workload
Prefer modular code over premature microservices
One deployable system with clear internal modules is usually better than three services with unclear ownership.
Keep AI features behind the same API boundary
Teams can assemble capable apps faster than they could a few years ago. Maintainability still comes from platform discipline more than model novelty.
If you add AI at all, isolate it behind the same API boundary. Do not let the front end bind directly to experimental model responses.
Step 11: Watch for the common failure modes—and fix them fast
Failure mode 1: Hardcoded secrets
Symptom:
- leaked credentials
- blocked deployments
- inconsistent environments
Fast fix:
- move secrets to Key Vault
- inject configuration at deploy time
- use managed identity where possible
Failure mode 2: UI tightly coupled to database shape
Symptom:
- every schema change breaks the front end
- impossible backend refactors
Fast fix:
- stable DTOs
- API contracts
- repository mapping layer
Failure mode 3: No migrations
Symptom:
- dev, test, and production drift immediately
- nobody can recreate the environment
Fast fix:
- versioned schema changes
- repeatable seed scripts
- migration execution in CI/CD
Failure mode 4: Too many services too early
Symptom:
- unclear ownership
- higher cost
- more IAM complexity
- slower debugging
Fast fix:
- collapse to one UI, one API, one primary database, one storage service, one monitoring path
Step 12: Turn the pattern into a reusable internal standard
The opportunity is not just faster delivery.
It is faster delivery with cleaner operational boundaries.
Your minimum viable weekend checklist
If I were standardizing this for a platform team, the non-negotiables would be:
- one monorepo with
/app,/api,/db,/infra,/scripts,/docs - one thin API between UI and data
- versioned migrations
- reproducible seed data
- Key Vault-backed secrets handling
- separate developer, app, and user identities
- Bicep for environment creation
- one deployment script
- one CI workflow
- Application Insights telemetry
- Blob Storage for files and exports
- a health endpoint and smoke test
The intentional omissions
For speed, I would explicitly leave out:
- microservices
- message buses
- advanced API gateway policy layers
- custom auth stacks
- multiple persistence engines
- speculative AI features
That is not under-architecting.
That is disciplined simplification.
If you can ship a weekend app with these boundaries intact, you have not built a throwaway demo. You have built the first production-capable version of a system.
Which tradeoff would you reverse first in your environment—and why: skipping API Management on day one, insisting on migrations before UI work, or keeping everything in one modular repo?
#AzureArchitecture #AppDev #DataEngineering
Sources & References
- Azure IaaS defense in depth built on secure-by-design principles
- Microsoft named a Leader in the IDC MarketScape: Worldwide API Management 2026 Vendor Assessment
- Introducing Azure Accelerate for Databases: Modernize your data for AI with experts and investments
- Cloud Cost Optimization: Principles that still matter
- Optimize object storage costs automatically with smart tier, now generally available
Try it yourself
Run this tutorial as a Jupyter notebook: Download runbook.ipynb (35 cells, 28 KB).